Creating a simple static business card using REACT
Tech stack used: HTML, CSS, JS and React.JS


Introduction
Hello, world!
Today we are going to build a simple static web application (Business card to be more specific) using HTML, CSS, JS and React. Although this can be done simply using plain JS, using React in the project would be an excellent way to make the application more manageable. This blog would also make us appreciate React and its edge over plain Javascript even more.
Initial setup to create a React environment
We will first install Vite on our machine to set up the development environment for our project. (Vite is frontend tooling that lets the user set up a development environment for various frameworks like React and Vue etc.).
Simply run the following commands on your terminal (I use VS Code) to install Vite on your system.
npm create vite@latest
Select a suitable project name, framework and variant in the following prompt on the terminal (as shown).
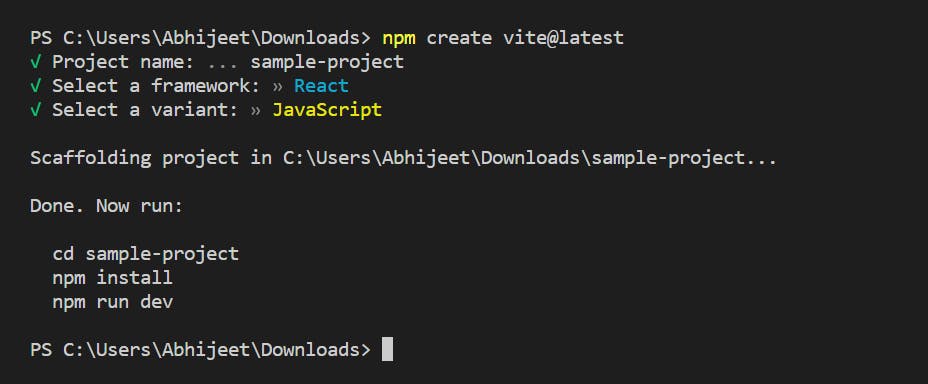
Run the following 3 commands
cd <project_name>
npm install
npm run dev
The last command will provide a live URL to our local project. The "sample-project" (or whatever the name of your project) folder will contain loads of files (for a demo application) created by Vite.
Delete all the files in the src folder as well as index.html file. Now we are all set to start our project! Let's GO!
HTML
The index.html will contain the least code of all the files. We will use Inter font.
<!DOCTYPE html>
<html lang="en">
  <head>
    <meta charset="UTF-8" />
    <link rel="icon" type="image/svg+xml" href="/src/assets/me.jpeg" />
    <meta name="viewport" content="width=device-width, initial-scale=1.0" />
    <link rel="preconnect" href="https://fonts.googleapis.com" />
    <link rel="preconnect" href="https://fonts.gstatic.com" crossorigin />
    <link
      href="https://fonts.googleapis.com/css2?family=Inter:wght@100;200;400;600&display=swap"
      rel="stylesheet"
    />
    <title>Business Card (Static)</title>
  </head>
  <body>
    <div id="root"></div>
    <script type="module" src="/src/main.jsx"></script>
  </body>
</html>
Structure of the project
We will create different React components for each section of the business card.
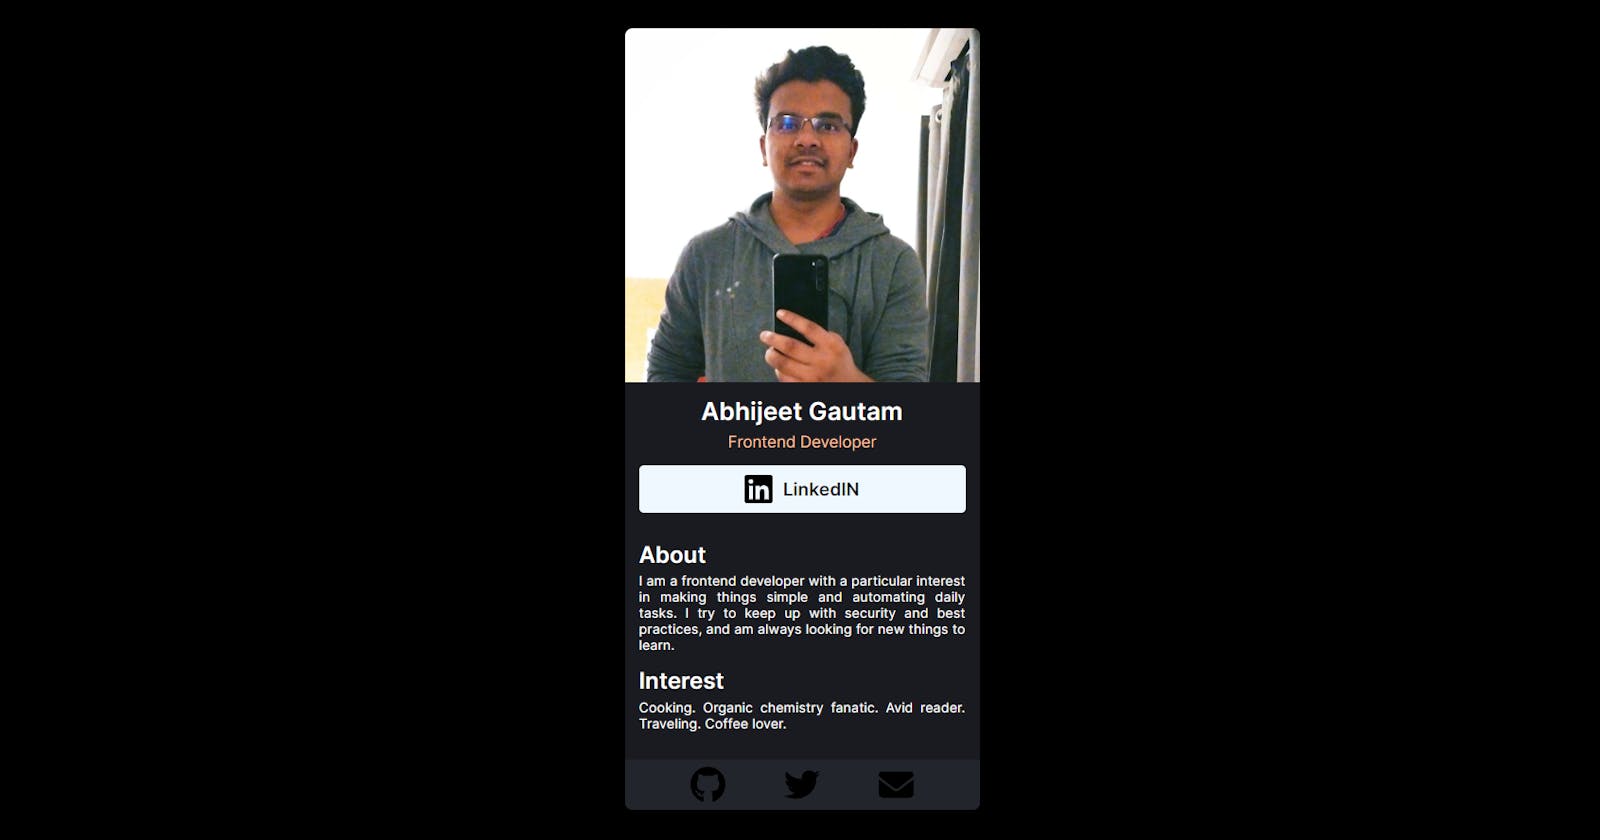
Info section - consisting of the profile photo, Profile name, profession and LinkedIn contact button
About section
Interest section
Footer section
React component: Info section
Make a Info.jsx file in the src folder.
/*file name: Info.jsx*/
import React from "react";
import profile from "./assets/me2.jpg";
import linkedIN from "./assets/linkedin.svg";

export default function Info() {
  return (
    <div className="info-section">
      <div className="img-container">
        <img className="profile-photo" src={profile} alt="profile photo" />
      </div>
      <h2 className="name">Abhijeet Gautam</h2>
      <p className="profession">Frontend Developer</p>
      <div className="contact-container">
        <div className="social-logo">
          <img src={linkedIN} alt="linkedIN" />
        </div>
        <p>LinkedIN</p>
      </div>
    </div>
  );
}
Notice that I did not use the relative path of the profile photo and LinkedIn icon. I have imported them from the assets folder. This avoids any issues in the deployment stage later.
React component: About and Interest sections
Pretty straightforward. The code for the Interest component will be exactly similar to that of the About component.
/*file name: About.jsx*/
import React from "react";

export default function About() {
  return (
    <div className="about-section">
      <h3 className="about-title">About</h3>
      <p className="about-text">
        I am a frontend developer with a particular interest in making things
        simple and automating daily tasks. I try to keep up with security and
        best practices, and am always looking for new things to learn.
      </p>
    </div>
  );
}
React component: Footer section
Here too, ensure that you import the icons from the assets folder.
/*file name : Footer.jsx*/
import React from "react";
import github from "./assets/github.svg";
import twitter from "./assets/twitter.svg";
import email from "./assets/envelope-solid.svg";

export default function Footer() {
  return (
    <div className="footer-section">
        <img className="footer-social" src={github} alt="github" />
        <img className="footer-social" src={twitter} alt="twitter" />
        <img className="footer-social" src={email} alt="email" />
    </div>
  );
}
React component: App
Collect all the components in a separate component (this is optional).
/*file name : App.jsx*/
import React from "react";
import Info from "./Info";
import About from "./About";
import Interest from "./Interest";
import Footer from "./Footer";

function App() {
  return (
    <div className="wrapper">
      <Info />
      <About />
      <Interest />
      <Footer />
    </div>
  );
}
export default App;
React component: Main
This component will render all other react components (assembled in the App.jsx file) to the HTML element with id = "root"
/*file name : main.jsx*/
import React from "react"
import ReactDOM from "react-dom"
import App from "./App.jsx"
import "./index.css"

const rootEl = document.getElementById("root")

ReactDOM.render(
  <App/>
  ,rootEl
)
Note: Make sure that you import the index.css file into the main.jsx file for applying CSS.
CSS Styling
CSS styling is pretty elementary. The blog is already pretty huge (and I do not wish to increase the length any further). I will be attaching the GitHub link to the project.
Conclusion
I had fun building this project. I have started to learn React and this was my first project, so I decided to make a blog out of it. I hope you find it useful and helpful.
See you at the next one!